# 鸟群模拟
一个有意思的程序并不需要从复杂的算法开始,从前我喜欢研究一些策略模拟,比如怎么用最少的钱完成要求的事情,或者一些动态规划算法,在表中完成一步步推导,又或者一些企业级的工程化项目。
我常常望着天空发呆,看鸟群聚了又散,他们的轨迹是什么样的?想起来我的室友给我介绍过一次鱼群模拟,应该是在 Unity 中实现的的吧,是一个三维的模拟,我对这方面不太了解,但总之效果很炫酷,这次我想做一个很简单的小 demo,用 Python 模拟一群鸟在二维空间中的运动。
随便打了几下:
class Bird: | |
def __init__(self, position, velocity): | |
self.position = position | |
self.velocity = velocity | |
def update_position(self): | |
self.position[0] += self.velocity[0] | |
self.position[1] += self.velocity[1] | |
def update_velocity(self, acceleration): | |
decay_factor = 0.9 | |
self.velocity[0] = self.velocity[0] * decay_factor + acceleration[0] | |
self.velocity[1] = self.velocity[1] * decay_factor + acceleration[1] | |
def apply_behavior(self, birds): | |
pass |
import math | |
import random | |
from Bird import Bird | |
class Simulation: | |
def __init__(self, num_birds): | |
self.birds = [] | |
for _ in range(num_birds): | |
# 随机位置 | |
x = random.uniform(0, 100) | |
y = random.uniform(0, 100) | |
# 随机方向 | |
angle = random.uniform(0, 2 * math.pi) | |
vx = math.cos(angle) | |
vy = math.sin(angle) | |
bird = Bird( | |
[x, y], | |
[vx, vy] | |
) | |
self.birds.append(bird) | |
def update(self): | |
for bird in self.birds: | |
bird.update_position() | |
# 超出边界后,从另一侧重新出现 | |
bird.position[0] %= 100 | |
bird.position[1] %= 100 |
import matplotlib | |
matplotlib.use("TkAgg") | |
from matplotlib.animation import FuncAnimation | |
from simulation import Simulation | |
import matplotlib.pyplot as plt | |
from matplotlib.animation import FuncAnimation | |
from simulation import Simulation | |
simulation = Simulation(num_birds=100) | |
fig, ax = plt.subplots(figsize=(8, 8)) | |
ax.set_xlim(0, 100) | |
ax.set_ylim(0, 100) | |
ax.set_xlabel("X") | |
ax.set_ylabel("Y") | |
ax.set_title("Bird Flock Simulation") | |
ax.grid() | |
x = [bird.position[0] for bird in simulation.birds] | |
y = [bird.position[1] for bird in simulation.birds] | |
vx = [bird.velocity[0] for bird in simulation.birds] | |
vy = [bird.velocity[1] for bird in simulation.birds] | |
quiver = ax.quiver( | |
x, | |
y, | |
vx, | |
vy, | |
angles="xy", | |
scale_units="xy", | |
scale=0.2 | |
) | |
def animate(frame): | |
# 1. 更新所有鸟的位置 | |
simulation.update() | |
# 2. 获取新的位置 | |
x = [bird.position[0] for bird in simulation.birds] | |
y = [bird.position[1] for bird in simulation.birds] | |
vx = [bird.velocity[0] for bird in simulation.birds] | |
vy = [bird.velocity[1] for bird in simulation.birds] | |
# 3. 修改箭头位置 | |
quiver.set_offsets(list(zip(x, y))) | |
# 4. 修改箭头方向 | |
quiver.set_UVC(vx, vy) | |
return quiver, | |
animation = FuncAnimation( | |
fig, | |
animate, | |
interval=50, | |
blit=False, | |
cache_frame_data=False | |
) | |
plt.show() |
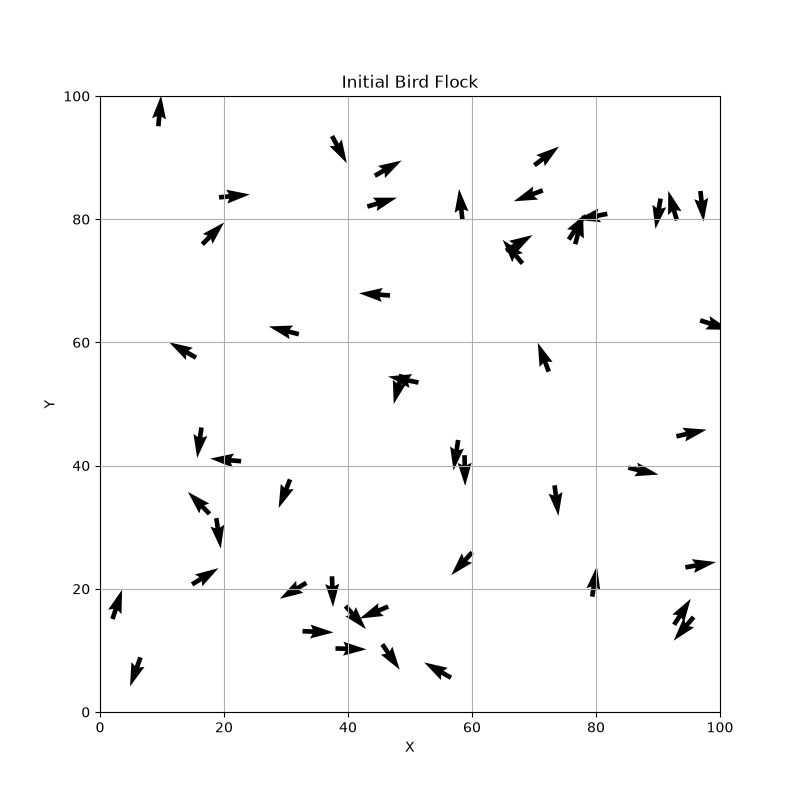
做出了如下的效果:
他们会自己动起来:
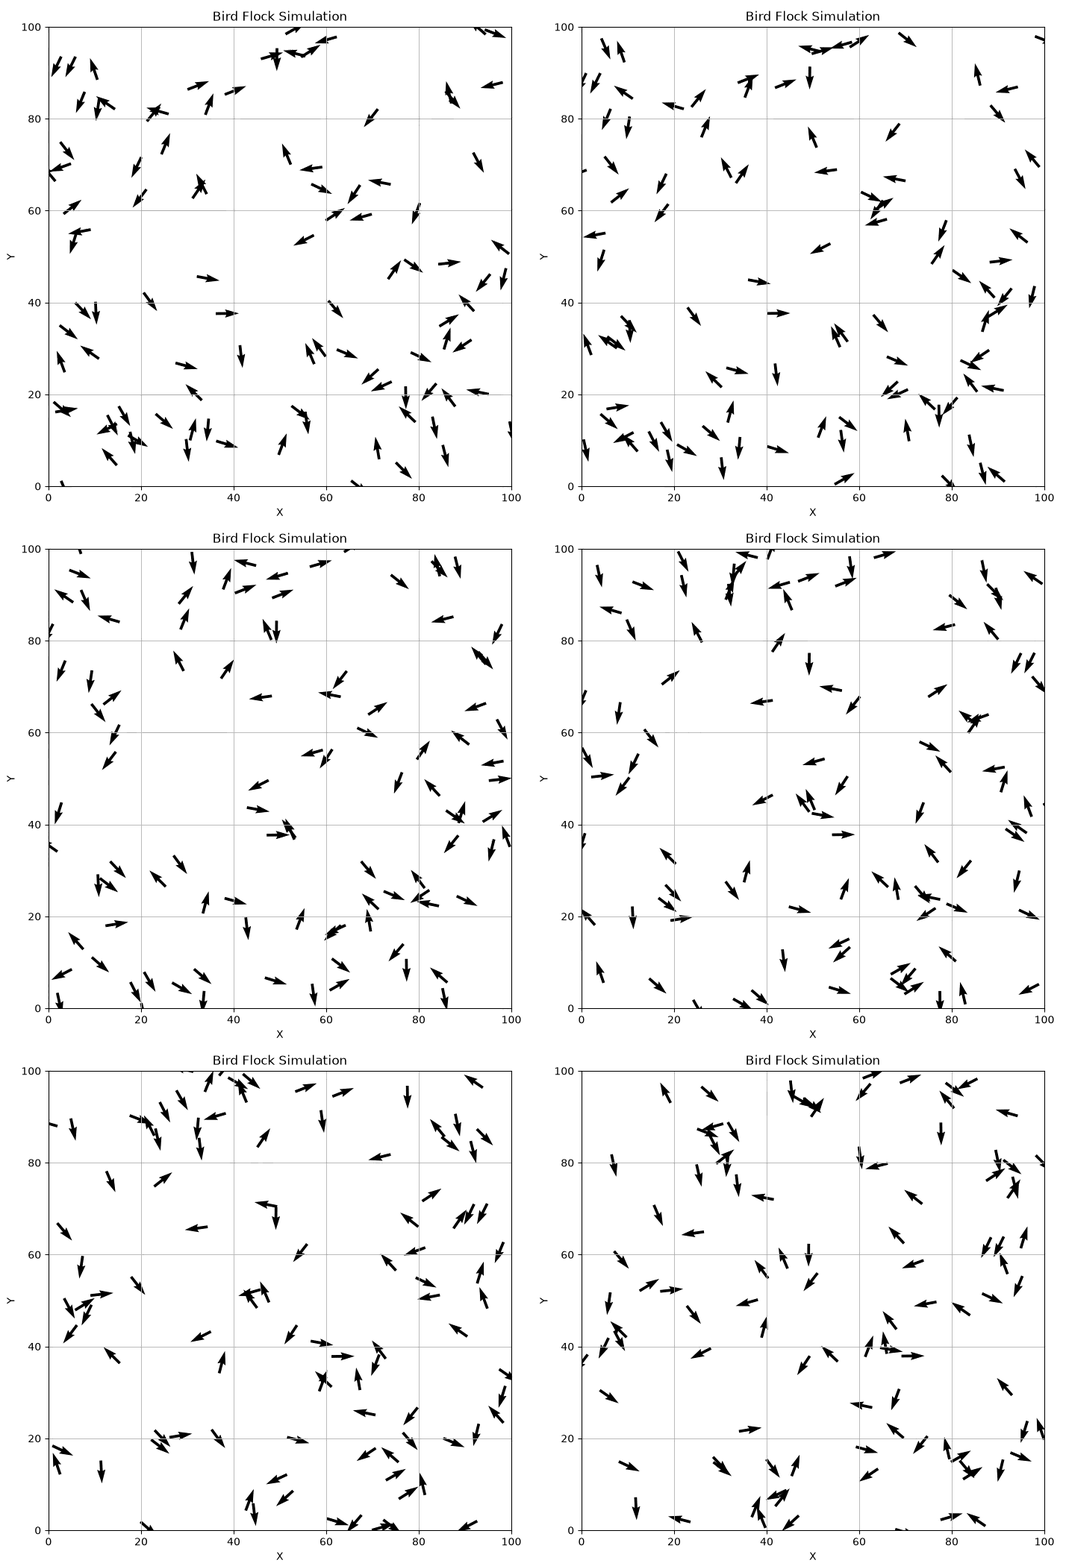
每一只鸟都有随机的位置,也有随机的飞行方向。它们彼此独立,各飞各的,整个画面看起来杂乱无章。
但真实世界中的鸟群并不是这样,当许多鸟聚集在一起时,它们会观察周围同伴的位置和运动方向,并不断调整自己的飞行状态。经过一段时间之后,原本混乱的个体会逐渐形成具有整体性的群体运动。
这其实是一个非常有意思的问题,如果每一只鸟都只遵守几个很简单的局部规则,能不能最终产生看起来非常复杂的群体行为?
让我们从零开始!
# 如何表示一只鸟?
程序里到底应该怎样表示一只鸟?
对于一只正在飞行的鸟来说,最核心的其实只有两个信息:
- 它现在在哪里
- 它现在往哪里飞
position 表示鸟当前的位置,而 velocity 表示鸟当前的飞行方向和速度。
因此,我们可以先定义一个最简单的 Bird 类:
class Bird: | |
def __init__(self, position, velocity): | |
self.position = position | |
self.velocity = velocity |
一只鸟就可以这样创建:
bird = Bird( | |
position=[30, 50], | |
velocity=[1, 0] | |
) |
鸟的运动,本质上就是不断根据速度更新位置,假设当前位置为:
position = [30, 50] |
速度为:
velocity = [1, 0.5] |
经过一个时间步之后,可以简单地写成:
position[0] += velocity[0] | |
position[1] += velocity[1] |
于是位置就会从:
[30, 50] |
变成:
[31, 50.5] |
这样,一只鸟就真正动起来了。
# 如何随机生成一群鸟?
如果所有鸟一开始都在同一个位置,并且朝着同一个方向飞,那么后面的群体行为其实没有太大意义。因为整个系统从一开始就是统一的,我们也看不到 “从混乱逐渐形成一致” 的过程。
鸟群初始化时最好满足两个条件:
- 鸟的位置是随机的
- 鸟的飞行方向也是随机的
假设我们的二维空间范围是:
X: 0 ~ 100 | |
Y: 0 ~ 100 |
那么一只鸟的位置可以随机生成:
x = random.uniform(0, 100) | |
y = random.uniform(0, 100) |
random.uniform(a, b) 会在 a 和 b 之间随机生成一个浮点数。
位置随机之后,还需要让每只鸟朝不同方向飞,这里有一种很方便的做法:先随机生成一个角度。
angle = random.uniform(0, 2 * math.pi) |
因为一个完整的圆对应:
所以随机生成一个这个范围内的角度,就相当于随机选择了一个飞行方向。
然后利用三角函数,把这个角度转换成二维速度:
vx = math.cos(angle) | |
vy = math.sin(angle) |
也就是:
比如,当:
时:
vx = 1 | |
vy = 0 |
鸟向右飞。
当角度随机变化时,鸟就可能朝任意方向飞行,虽然每只鸟的方向不同,但它们初始速度的大小都是一样的。
接下来,可以定义一个 Simulation 类,用来统一管理整个鸟群:
import math | |
import random | |
from Bird import Bird | |
class Simulation: | |
def __init__(self, num_birds): | |
self.birds = [] | |
for _ in range(num_birds): | |
# 随机位置 | |
x = random.uniform(0, 100) | |
y = random.uniform(0, 100) | |
# 随机飞行方向 | |
angle = random.uniform(0, 2 * math.pi) | |
vx = math.cos(angle) | |
vy = math.sin(angle) | |
bird = Bird( | |
[x, y], | |
[vx, vy] | |
) | |
self.birds.append(bird) |
这里根据 num_birds 数量生成鸟。
# 如何把鸟群可视化出来?
咱就用最简单的 Matplotlib 吧,但是因为每只鸟既有一个位置,又有一个飞行方向,所以单纯使用散点并不是特别合适。
plt.scatter(x, y) |
只能告诉我们鸟在哪里,鸟正在往哪里飞不知道。因此,这里使用 Matplotlib 提供的 quiver ,quiver 可以在二维坐标系中绘制带方向的箭头,它最核心的四个参数是:
plt.quiver( | |
x, | |
y, | |
vx, | |
vy | |
) |
这和之前定义的鸟类完全一样。那就让我们开始吧!
首先创建一个鸟群:
simulation = Simulation(num_birds=50) |
这时候:
simulation.birds |
里面保存了 50 个 Bird 对象。
分别取出所有鸟的横坐标:
x = [bird.position[0] for bird in simulation.birds] |
纵坐标:
y = [bird.position[1] for bird in simulation.birds] |
再取出速度在 X 方向上的分量:
vx = [bird.velocity[0] for bird in simulation.birds] |
以及 Y 方向上的分量:
vy = [bird.velocity[1] for bird in simulation.birds] |
这样就得到了绘图需要的四组数据:
x 鸟的横坐标 | |
y 鸟的纵坐标 | |
vx 水平方向速度 | |
vy 垂直方向速度 |
接下来创建一个画布:
fig, ax = plt.subplots(figsize=(8, 8)) |
并把模拟空间限制在:
ax.set_xlim(0, 100) | |
ax.set_ylim(0, 100) |
这正好和前面初始化鸟的位置范围保持一致:
x = random.uniform(0, 100) | |
y = random.uniform(0, 100) |
然后这样:
quiver = ax.quiver( | |
x, | |
y, | |
vx, | |
vy, | |
angles="xy", | |
scale_units="xy", | |
scale=0.2 | |
) |
完整的静态可视化代码如下:
import matplotlib.pyplot as plt | |
from simulation import Simulation | |
simulation = Simulation(num_birds=50) | |
x = [bird.position[0] for bird in simulation.birds] | |
y = [bird.position[1] for bird in simulation.birds] | |
vx = [bird.velocity[0] for bird in simulation.birds] | |
vy = [bird.velocity[1] for bird in simulation.birds] | |
fig, ax = plt.subplots(figsize=(8, 8)) | |
ax.set_xlim(0, 100) | |
ax.set_ylim(0, 100) | |
ax.set_xlabel("X") | |
ax.set_ylabel("Y") | |
ax.set_title("Bird Flock Simulation") | |
ax.grid(True) | |
ax.quiver( | |
x, | |
y, | |
vx, | |
vy, | |
angles="xy", | |
scale_units="xy", | |
scale=0.2 | |
) | |
plt.show() |
运行程序之后,我们就能第一次真正看到自己的鸟群。
这些鸟虽然已经被画出来了,但它们还不会动。下一步,就要让程序不断更新鸟的位置,并不断刷新画面,把这一张静态图片真正变成一个连续运动的鸟群动画。
# 如何让鸟群动起来?
对于一只鸟来说,如果当前位置是:
position = [30, 50] |
速度是:
velocity = [1, 0.5] |
那么经过一个时间步之后,它的位置就可以更新为:
position[0] += velocity[0] | |
position[1] += velocity[1] |
因此,可以在 Bird 类中加入一个 update_position() 方法:
class Bird: | |
def __init__(self, position, velocity): | |
self.position = position | |
self.velocity = velocity | |
def update_position(self): | |
self.position[0] += self.velocity[0] | |
self.position[1] += self.velocity[1] |
为了让模型尽量简单,可以先把每一帧看成一个固定时间步,因此暂时直接相加。
单只鸟可以移动之后,接下来就需要让 Simulation 负责统一更新所有鸟。
def update(self): | |
for bird in self.birds: | |
bird.update_position() |
每执行一次 update,整个鸟群都会向前移动一步。
现在还会遇到一个问题,我们的模拟区域是 100*100 的,如果一只鸟一直向右飞,它迟早会超过 100,一种很简单的处理方法是使用周期边界,鸟从右边飞出去,就从左边重新出现,和小时候玩那个贪吃蛇一样,我有时候就会去试试它有没有周期边界这个功能,虽然大多数都撞墙了哈哈哈哈。
实现也很简单,可以利用取模运算实现:
bird.position[0] %= 100 | |
bird.position[1] %= 100 |
因此 Simulation 中的更新函数可以写成:
def update(self): | |
for bird in self.birds: | |
bird.update_position() | |
bird.position[0] %= 100 | |
bird.position[1] %= 100 |
这样所有鸟都会一直留在我们的模拟空间中。
# 使用 FuncAnimation 创建动画
现在鸟已经可以移动了,但我们仍然需要不断刷新画面,这里可以使用 Matplotlib 提供的 FuncAnimation。
FuncAnimation 的作用可以简单理解为:每隔一段时间,自动调用一次我们指定的函数。
def animate(frame): | |
# 1. 更新所有鸟的位置 | |
simulation.update() | |
# 2. 获取新的位置 | |
x = [bird.position[0] for bird in simulation.birds] | |
y = [bird.position[1] for bird in simulation.birds] | |
vx = [bird.velocity[0] for bird in simulation.birds] | |
vy = [bird.velocity[1] for bird in simulation.birds] | |
# 3. 修改箭头位置 | |
quiver.set_offsets(list(zip(x, y))) | |
# 4. 修改箭头方向 | |
quiver.set_UVC(vx, vy) | |
return quiver, |
set_UVC() 的作用就是更新箭头的方向,然后这里这样做:
animation = FuncAnimation( | |
fig, | |
animate, | |
interval=50, | |
blit=False, | |
cache_frame_data=False | |
) |
完整代码:
import matplotlib | |
matplotlib.use("TkAgg") | |
from matplotlib.animation import FuncAnimation | |
from simulation import Simulation | |
import matplotlib.pyplot as plt | |
from matplotlib.animation import FuncAnimation | |
from simulation import Simulation | |
simulation = Simulation(num_birds=100) | |
fig, ax = plt.subplots(figsize=(8, 8)) | |
ax.set_xlim(0, 100) | |
ax.set_ylim(0, 100) | |
ax.set_xlabel("X") | |
ax.set_ylabel("Y") | |
ax.set_title("Bird Flock Simulation") | |
ax.grid() | |
x = [bird.position[0] for bird in simulation.birds] | |
y = [bird.position[1] for bird in simulation.birds] | |
vx = [bird.velocity[0] for bird in simulation.birds] | |
vy = [bird.velocity[1] for bird in simulation.birds] | |
quiver = ax.quiver( | |
x, | |
y, | |
vx, | |
vy, | |
angles="xy", | |
scale_units="xy", | |
scale=0.2 | |
) | |
def animate(frame): | |
# 1. 更新所有鸟的位置 | |
simulation.update() | |
# 2. 获取新的位置 | |
x = [bird.position[0] for bird in simulation.birds] | |
y = [bird.position[1] for bird in simulation.birds] | |
vx = [bird.velocity[0] for bird in simulation.birds] | |
vy = [bird.velocity[1] for bird in simulation.birds] | |
# 3. 修改箭头位置 | |
quiver.set_offsets(list(zip(x, y))) | |
# 4. 修改箭头方向 | |
quiver.set_UVC(vx, vy) | |
return quiver, | |
animation = FuncAnimation( | |
fig, | |
animate, | |
interval=50, | |
blit=False, | |
cache_frame_data=False | |
) | |
plt.show() |
到这里,一个最基础的二维鸟群运动系统就已经完成了,不过现在这些鸟之间仍然没有任何联系,仍然只是很多个独立个体的随机运动。
下一步,我们就要真正开始加入 “鸟群行为”:让每只鸟观察附近的同伴,并逐渐调整自己的飞行方向。
# 如何让鸟开始观察周围的同伴?
现实中的一只鸟并不会关注整个天空中的所有同伴,它通常只会对自己附近的一小部分个体作出反应。我们首先需要给每只鸟定义一个感知范围。
比如 VISION_RADIUS = 15,每只鸟只观察距离自己 15 个单位以内的其他鸟,以把它理解成一个以自己为圆心的圆。
假设当前两只鸟的位置是:
它们之间的距离可以通过二维欧氏距离计算:
例如:
Bird A = (10, 20) | |
Bird B = (13, 24) |
VISION_RADIUS = 15 |
5<15,所以 Bird B 就属于 Bird A 的邻居。因此,我们可以给 Bird 类增加一个方法:
def get_neighbors(self, birds, vision_radius): | |
neighbors = [] | |
for other in birds: | |
# 不观察自己 | |
if other is self: | |
continue | |
dx = other.position[0] - self.position[0] | |
dy = other.position[1] - self.position[1] | |
distance = (dx ** 2 + dy ** 2) ** 0.5 | |
if distance < vision_radius: | |
neighbors.append(other) | |
return neighbors |
neighbors 用来保存当前这只鸟附近的其他鸟,遍历整个鸟群当然他要排除自己。
接着计算:
dx = other.position[0] - self.position[0] | |
dy = other.position[1] - self.position[1] | |
distance = (dx ** 2 + dy ** 2) ** 0.5 |
得到欧氏距离,然后就判断:
if distance < vision_radius: | |
neighbors.append(other) |
是就加入邻居列表。
现在 Bird 类可以先写成:
class Bird: | |
def __init__(self, position, velocity): | |
self.position = position | |
self.velocity = velocity | |
def update_position(self): | |
self.position[0] += self.velocity[0] | |
self.position[1] += self.velocity[1] | |
def get_neighbors(self, birds, vision_radius): | |
neighbors = [] | |
for other in birds: | |
if other is self: | |
continue | |
dx = other.position[0] - self.position[0] | |
dy = other.position[1] - self.position[1] | |
distance = (dx ** 2 + dy ** 2) ** 0.5 | |
if distance < vision_radius: | |
neighbors.append(other) | |
return neighbors |
从现在开始,鸟群中的个体第一次真正建立了联系。
可以暂时在程序中选一只鸟测试:
bird = simulation.birds[0] | |
neighbors = bird.get_neighbors( | |
simulation.birds, | |
vision_radius=15 | |
) | |
print(len(neighbors)) |
输出是 5,说明有五个邻居。
# 如何让鸟逐渐统一飞行方向?Alignment 方向对齐
现在每只鸟虽然 “看见” 了周围的同伴,但仍然按照自己原来的方向飞行,我们要加入鸟群行为中的第一个核心规则:Alignment,方向对齐。
它的思想非常简单:一只鸟会观察附近其他鸟的飞行方向,然后逐渐调整自己的方向,使自己和周围鸟保持一致。
假设当前这只鸟附近有 3 个邻居它们的速度分别是:
Bird A: [1.0, 0.0] | |
Bird B: [0.8, 0.6] | |
Bird C: [0.0, 1.0] |
那么我们可以把它们的速度求平均:
得到:
平均速度大致指向右上,也就是说当前这只鸟周围的大多数邻居整体上正在向右上方飞,那么当前鸟也应该逐渐向这个方向调整。
最直接的写法当然可以是:
self.velocity = avg_velocity |
但是这样会产生一个问题,鸟会瞬间改变方向,这种转向会显得非常生硬,后面我会给你展示一下这个效果。
我们真正想要的是逐渐靠近邻居的平均方向,因此不是直接修改速度,而是先计算,当前速度和目标速度之间差多少。
假设当前鸟的速度是
邻居平均速度是
那么调整方向可以计算为
也就是
这个向量的含义并不是鸟的新速度,而是当前鸟应该怎样修改自己的速度:
水平方向稍微减小 | |
垂直方向增加 |
如果直接把整个调整量都加到速度上:
self.velocity[0] += ax | |
self.velocity[1] += ay |
实际上和之前的 self.velocity = avg_velocity 没有区别,所以我们再加入一个参数:ALIGNMENT_WEIGHT = 0.05
ax *= ALIGNMENT_WEIGHT | |
ay *= ALIGNMENT_WEIGHT |
这样每一次只调整一点点,会形成一条优雅的曲线。于是就有了这样的方法:
def alignment(self, neighbors): | |
if not neighbors: | |
return [0, 0] | |
avg_vx = 0 | |
avg_vy = 0 | |
for other in neighbors: | |
avg_vx += other.velocity[0] | |
avg_vy += other.velocity[1] | |
avg_vx /= len(neighbors) | |
avg_vy /= len(neighbors) | |
ax = avg_vx - self.velocity[0] | |
ay = avg_vy - self.velocity[1] | |
alignment_weight = 0.05 | |
return [ | |
ax * alignment_weight, | |
ay * alignment_weight | |
] |
如果没邻居就不用调整,有就计算邻居的平均方向,计算调整量然后乘上系数。接下来,可以把前面写的 get_neighbors() 和 alignment() 串起来
def apply_behavior(self, birds): | |
vision_radius = 15 | |
neighbors = self.get_neighbors( | |
birds, | |
vision_radius | |
) | |
acceleration = self.alignment( | |
neighbors | |
) | |
return acceleration |
apply_behavior 就是观察周围邻居,计算自己应该如何转向,返回速度调整量。
然后再给 Bird 加一个:
def update_velocity(self, acceleration): | |
self.velocity[0] += acceleration[0] | |
self.velocity[1] += acceleration[1] |
然后在 Simulation 中:
def update(self): | |
accelerations = [] | |
# 先计算所有鸟的调整量 | |
for bird in self.birds: | |
acceleration = bird.apply_behavior( | |
self.birds | |
) | |
accelerations.append(acceleration) | |
# 再统一更新速度和位置 | |
for bird, acceleration in zip( | |
self.birds, | |
accelerations | |
): | |
bird.update_velocity(acceleration) | |
bird.update_position() | |
bird.position[0] %= 100 | |
bird.position[1] %= 100 |
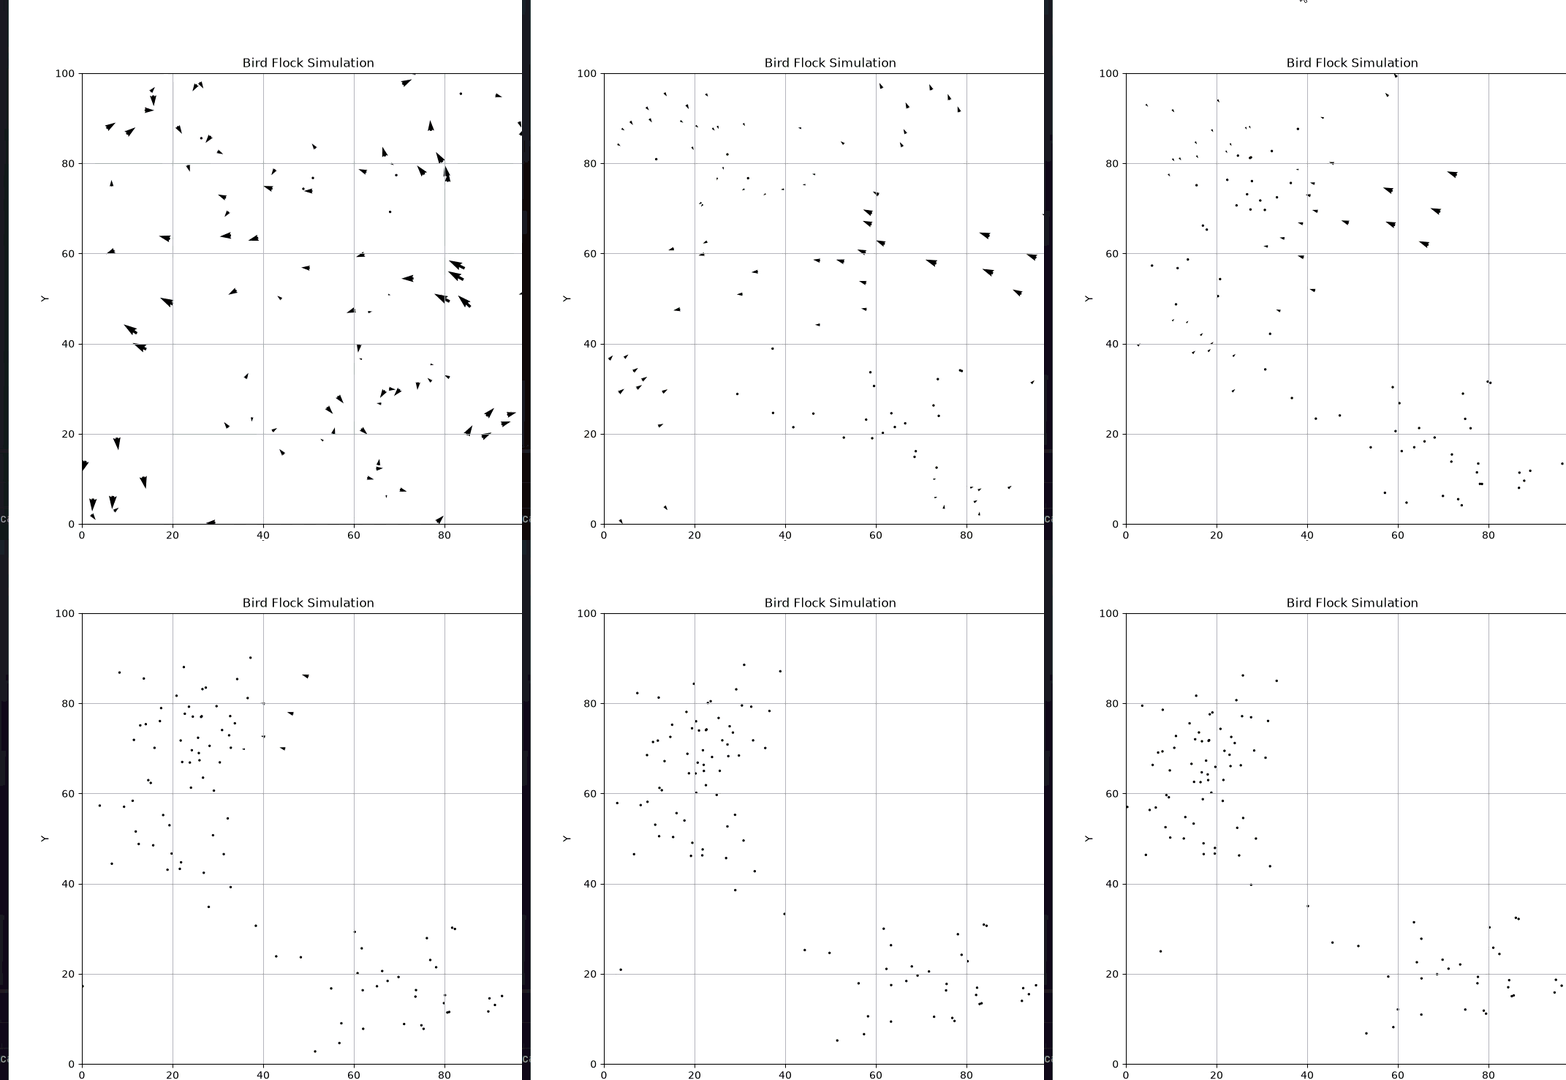
加入 Alignment 后,我发现鸟群虽然开始逐渐统一方向,但整个鸟群的移动速度也明显下降了。当多个速度方向不一致时,不同方向的向量会相互抵消,使平均速度的模长减小。因此,当前鸟在向邻居平均速度靠近的同时,也在不断降低自己的速度。因此每次速度更新后,使鸟只改变方向,而保持固定的飞行速度。
def update_velocity(self, acceleration): | |
self.velocity[0] += acceleration[0] | |
self.velocity[1] += acceleration[1] | |
# 计算当前速度大小 | |
speed = math.sqrt( | |
self.velocity[0] ** 2 | |
+ self.velocity[1] ** 2 | |
) | |
# 防止除以 0 | |
if speed > 0: | |
target_speed = 1.0 | |
self.velocity[0] = ( | |
self.velocity[0] | |
/ speed | |
* target_speed | |
) | |
self.velocity[1] = ( | |
self.velocity[1] | |
/ speed | |
* target_speed | |
) |
这里是保持方向不变,把向量长度缩放到 1。
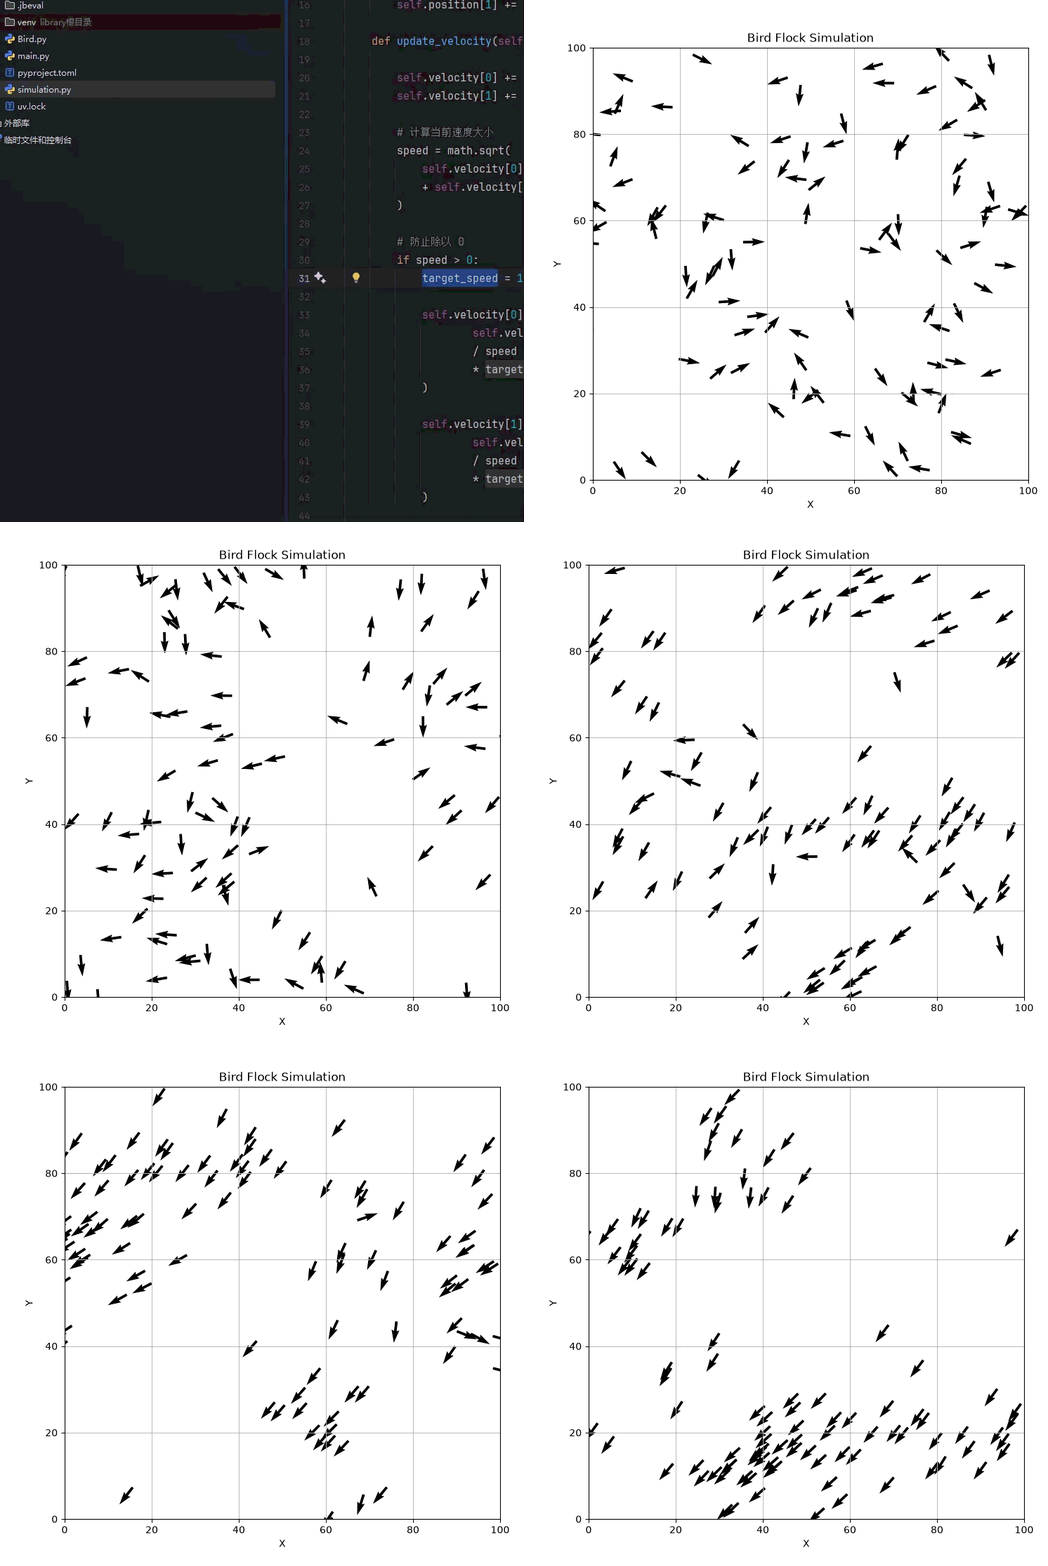
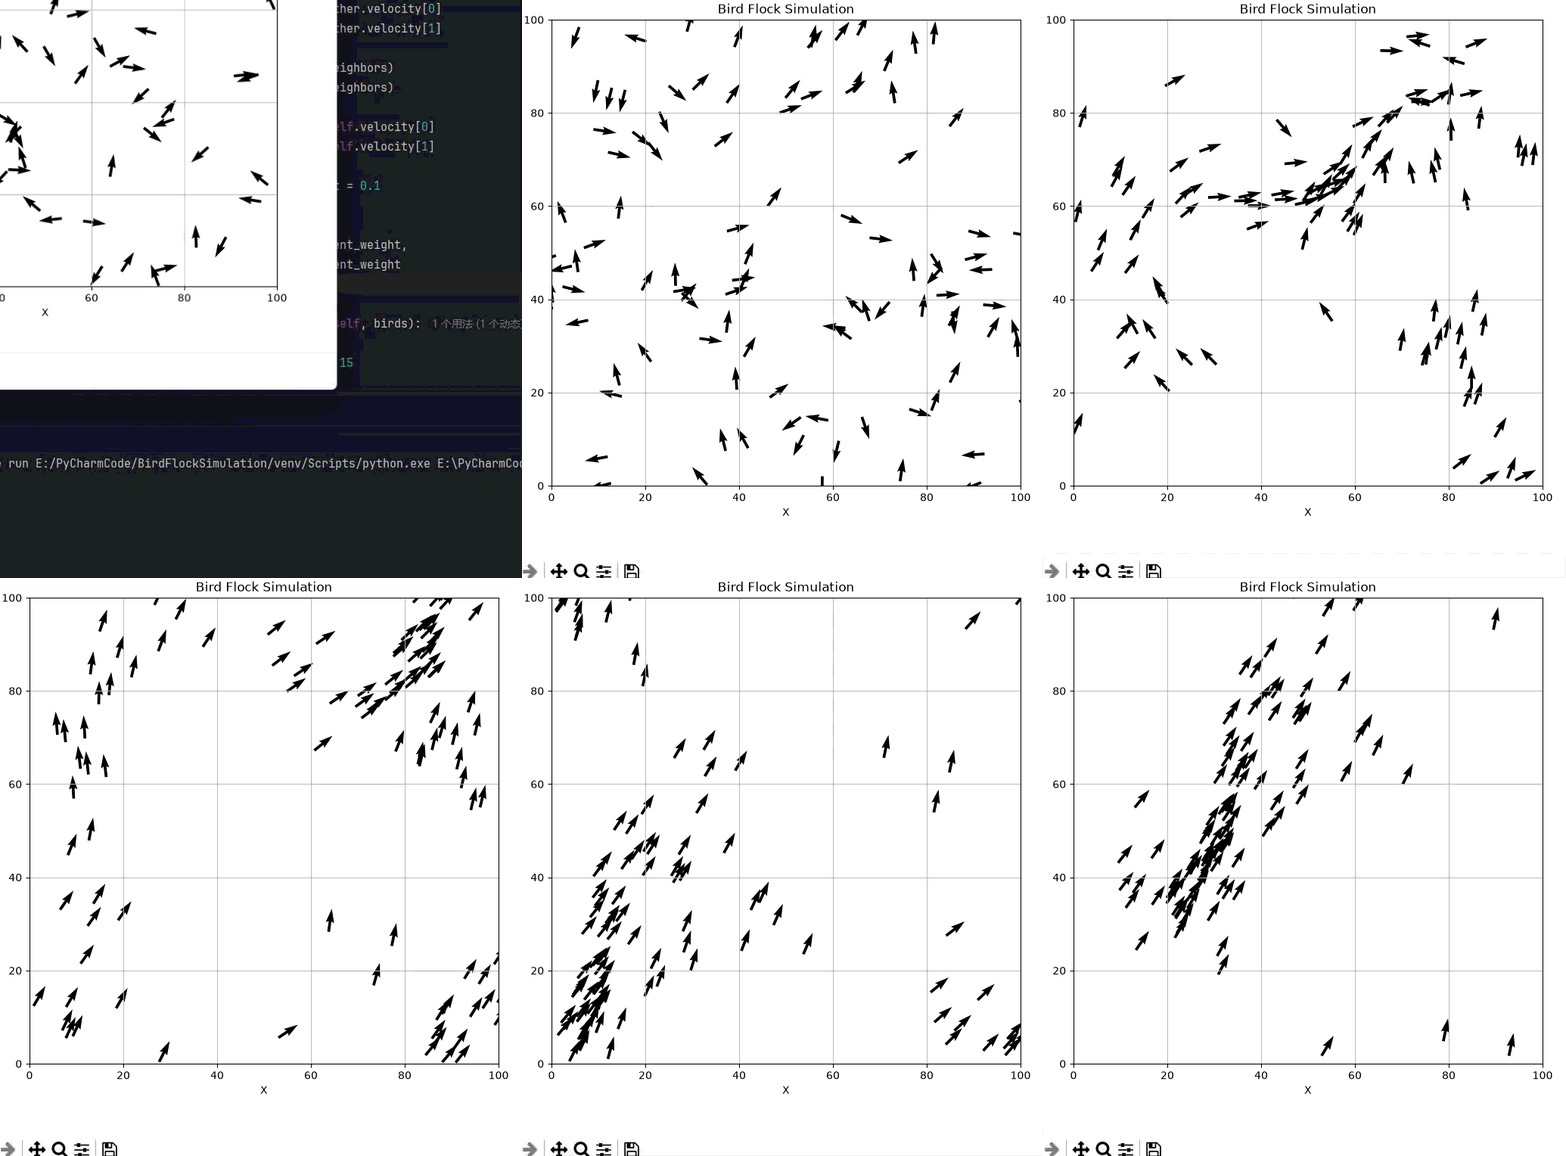
通过加大 alignment_weight,可以加速方向的调整:
# 如何让鸟群保持在一起?Cohesion 聚集规则
Alignment 之后,每只鸟会观察附近邻居的飞行方向,并逐渐调整自己的速度方向,可以看到,鸟群的方向开始逐渐统一,继续运行一段时间之后,又会发现一个新的问题,虽然大家飞行方向越来越接近,但是鸟和鸟之间仍然可能离得很远。
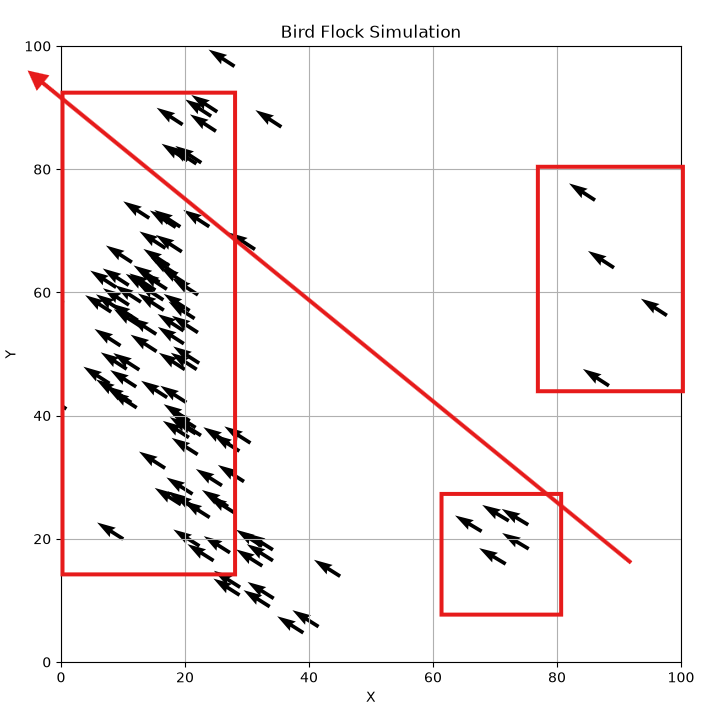
这时候它们虽然都在往相似的方向飞,但从视觉上看,并不像一个真正的鸟群,因此,我们还需要加入第二条规则:Cohesion,聚集。
Cohesion 的思路是,一只鸟会观察附近邻居的位置,然后稍微朝这些邻居的中心靠近,假设当前鸟周围有三只邻居,它们的位置分别是:
Bird A: [20, 30] | |
Bird B: [30, 40] | |
Bird C: [40, 50] |
那么这些邻居的中心位置,就是它们位置的平均值 [30, 40],也许 [30, 40] 并不存在真实的一只鸟,但是他们就是会向这个逻辑中心靠近。
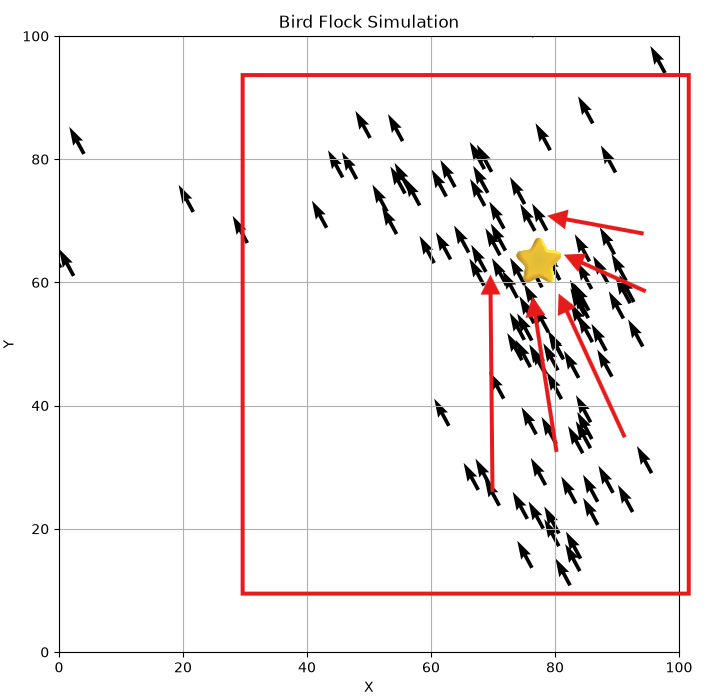
假设当前这只鸟的位置是 [20, 20],邻居中心是 [30, 40],那么从当前鸟指向邻居中心的方向就是:
dx = 30 - 20 | |
dy = 40 - 20 |
得到:
dx = 10 | |
dy = 20 |
我们希望当前鸟稍微朝右上方调整,当然,我们也可以直接让鸟:
velocity = center - position |
但是这样会产生非常强烈的聚集效果,鸟会迅速冲向邻居中心,整个运动会显得很生硬。Alignment 一样,我们仍然希望它只是 Alignment 一样,我们仍然希望它只是稍微靠近一点。同样需要一个权重 cohesion_weight = 0.01
然后:
dx *= cohesion_weight | |
dy *= cohesion_weight |
在 Bird 类中加入:
def cohesion(self, neighbors): | |
if not neighbors: | |
return [0, 0] | |
center_x = 0 | |
center_y = 0 | |
for other in neighbors: | |
center_x += other.position[0] | |
center_y += other.position[1] | |
center_x /= len(neighbors) | |
center_y /= len(neighbors) | |
dx = center_x - self.position[0] | |
dy = center_y - self.position[1] | |
cohesion_weight = 0.01 | |
return [ | |
dx * cohesion_weight, | |
dy * cohesion_weight | |
] |
接下来需要把这两个调整量合起来,修改 apply_behavior。
def apply_behavior(self, birds): | |
neighbors = self.get_neighbors( | |
birds, | |
vision_radius=15 | |
) | |
alignment = self.alignment(neighbors) | |
cohesion = self.cohesion(neighbors) | |
return [ | |
alignment[0] + cohesion[0], | |
alignment[1] + cohesion[1] | |
] |
这里其实就是把两个规则产生的 “转向量” 相加。
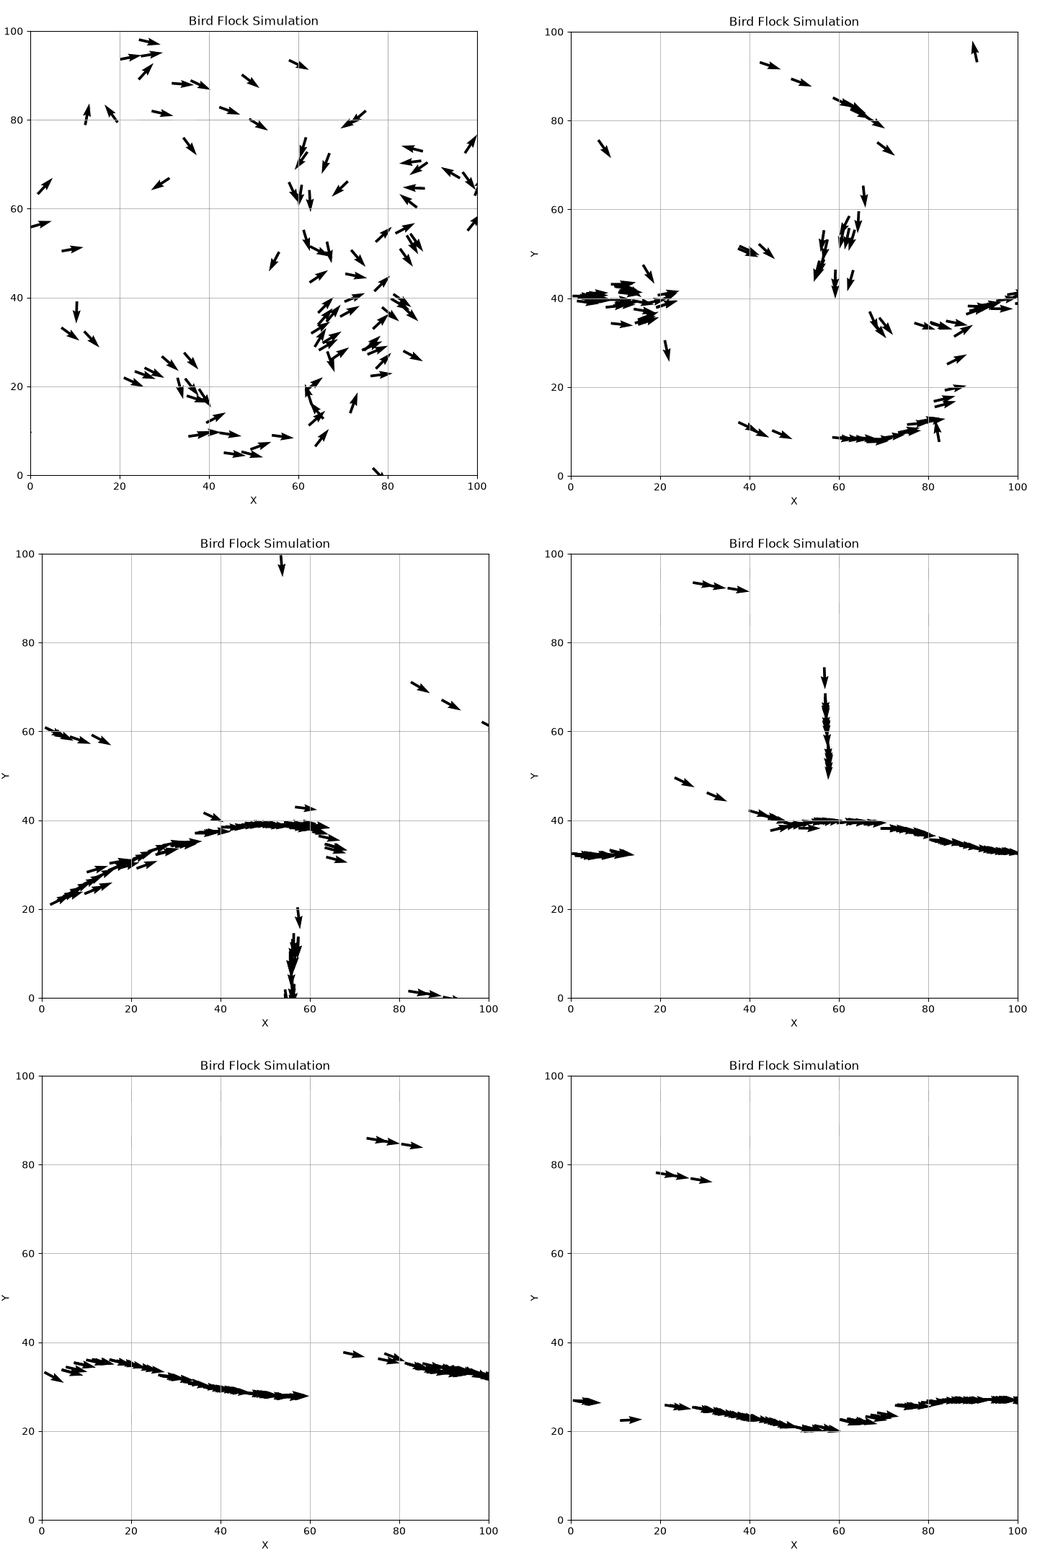
Cohesion 一直在告诉每只鸟,往中间靠,但所有鸟挤在非常小的区域里,这显然也不符合我们想要的效果,所以接下来,我们还需要加入第三条核心规则:所以接下来,我们还需要加入第三条核心规则:Separation,分离
# 如何让鸟彼此保持距离?Separation 分离规则
到现在为止,鸟群已经开始表现出比较明显的集体运动,它们会逐渐朝相似的方向飞,并且慢慢靠近彼此。但是继续运行一段时间之后,会发现一个新的问题,鸟会越来越靠近,甚至挤在一起。
所以我们需要加入第三条规则:**Separation,分离。** 它的作用就是当两只鸟距离太近时,让它们互相远离
# Separation 要单独设置一个距离
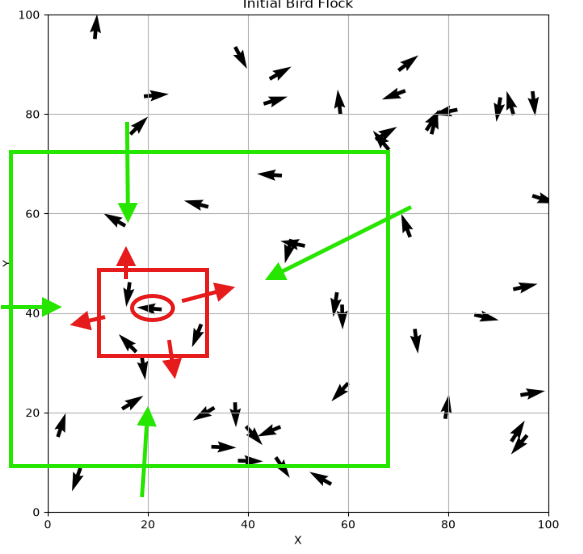
前面的邻居感知范围可能是:
vision_radius = 15 |
也就是说,15 个单位以内的鸟,我都可以观察,但是并不是所有邻居都需要避开。
但如果距离只有 2,就明显太近了,因此可以额外定义一个 separation_radius = 5,那么这个范围以内的,需要远离。
def separation(self, neighbors): | |
move_x = 0 | |
move_y = 0 | |
separation_radius = 5 | |
for other in neighbors: | |
dx = self.position[0] - other.position[0] | |
dy = self.position[1] - other.position[1] | |
distance = (dx ** 2 + dy ** 2) ** 0.5 | |
if 0 < distance < separation_radius: | |
move_x += dx | |
move_y += dy | |
separation_weight = 0.05 | |
return [ | |
move_x * separation_weight, | |
move_y * separation_weight | |
] |
这个就能实现分离 if 0 < distance < separation_radius,在这个之间的的,就需要推远,return 的永远是修正量。但还有一个可以改进的地方但还有一个可以改进的地方。现实中距离 4 和距离 0.5,显然不应该产生一样强的排斥。越近,避让应该越强,所以可以把距离考虑进去:
move_x += dx / (distance ** 2) | |
move_y += dy / (distance ** 2) |
就变成了这样:
def separation(self, neighbors): | |
move_x = 0 | |
move_y = 0 | |
separation_radius = 5 | |
for other in neighbors: | |
dx = self.position[0] - other.position[0] | |
dy = self.position[1] - other.position[1] | |
distance = (dx ** 2 + dy ** 2) ** 0.5 | |
if 0 < distance < separation_radius: | |
move_x += dx / (distance ** 2) | |
move_y += dy / (distance ** 2) | |
separation_weight = 0.08 | |
return [ | |
move_x * separation_weight, | |
move_y * separation_weight | |
] |
现在,一只鸟已经拥有三种行为:
Alignment | |
Cohesion | |
Separation |
修改 apply_behavior:
def apply_behavior(self, birds): | |
neighbors = self.get_neighbors( | |
birds, | |
vision_radius=15 | |
) | |
alignment = self.alignment(neighbors) | |
cohesion = self.cohesion(neighbors) | |
separation = self.separation(neighbors) | |
return [ | |
alignment[0] | |
+ cohesion[0] | |
+ separation[0], | |
alignment[1] | |
+ cohesion[1] | |
+ separation[1] | |
] |
现在可以把它们放在一起理解:
- Alignment 跟大家往差不多的方向飞
- Cohesion 别离大家太远
- Separation 但也别贴得太近
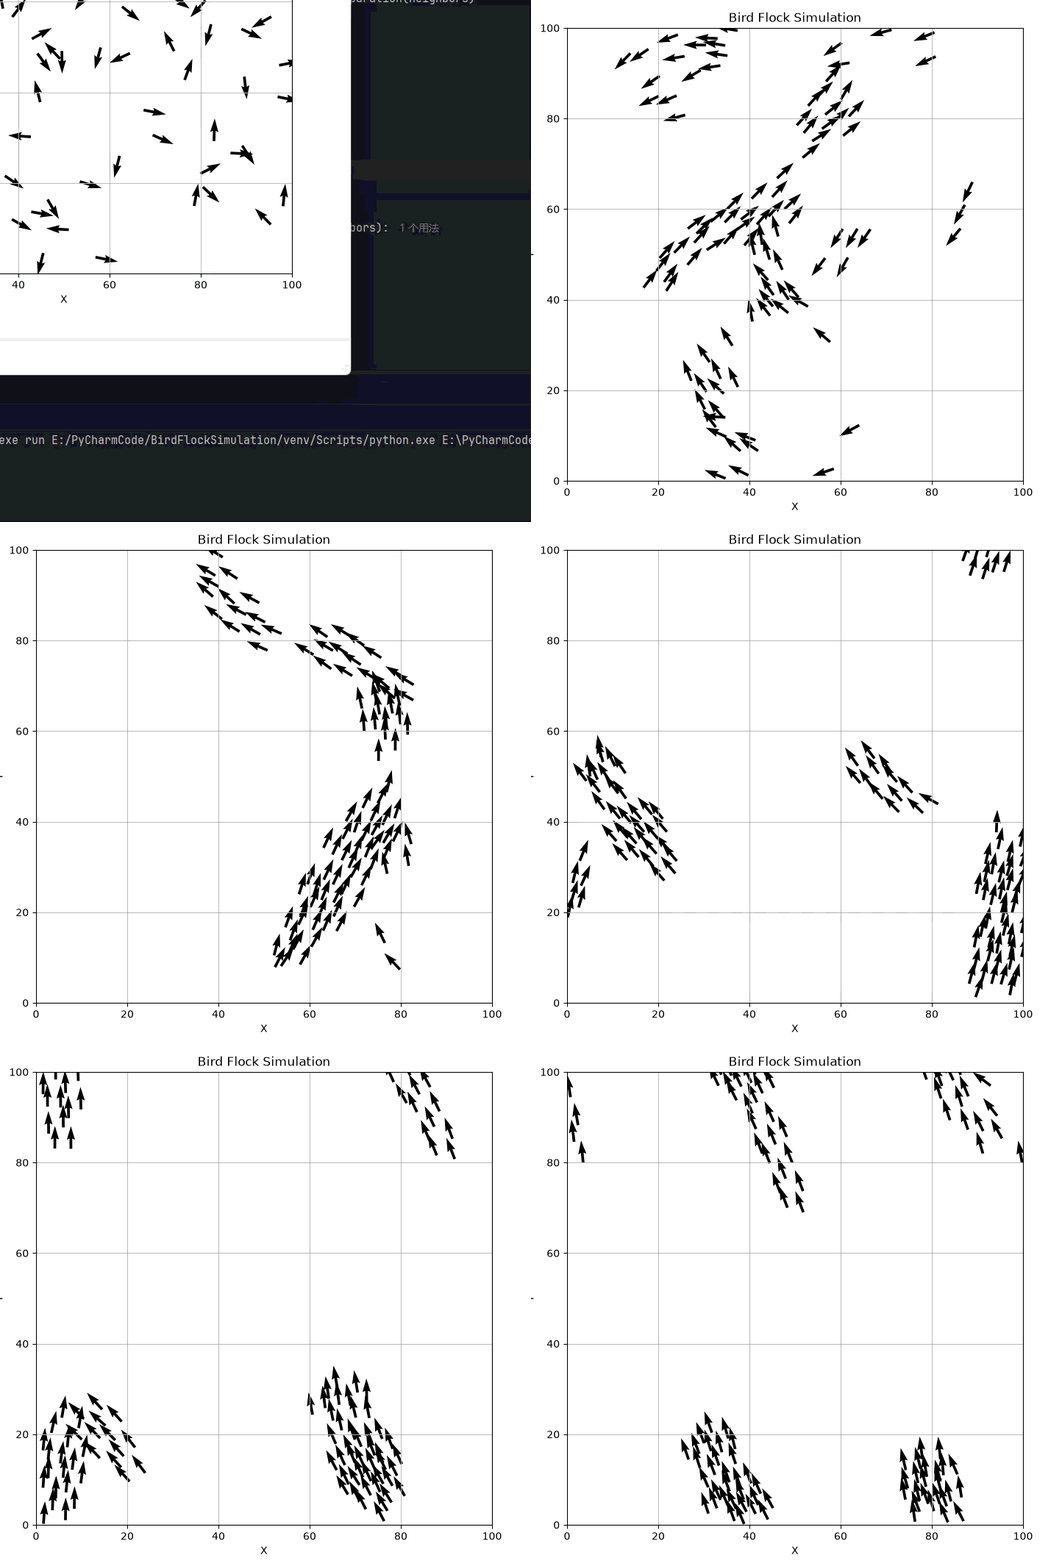
有意思的是,我们从来没有定义谁是领头鸟,也没有告诉系统整个鸟群必须排成什么形状,每一只鸟都只是在根据自己附近的邻居执行几个非常简单的规则。但是当大量个体同时执行这些规则时,却能够出现这样的复杂群体行为。后续只要我们细微的调整这三个权重,他就会越来越像。
这只是一次初步探索,制作的较为粗糙,意在满足我对这个鸟群模拟的好奇。
# AI 还是太好用了
import math | |
import time | |
import tkinter as tk | |
import numpy as np | |
from PIL import Image, ImageChops, ImageDraw, ImageFilter, ImageTk | |
WIDTH, HEIGHT = 900, 760 | |
BIRD_COUNT = 230 | |
SPEED = 2.0 | |
VISION_RADIUS = 85 | |
SEPARATION_RADIUS = 24 | |
ALIGNMENT = 0.055 | |
COHESION = 0.0025 | |
SEPARATION = 1.4 | |
TRAIL_RETENTION = 238 # 0~254:越大,拖尾越长。 | |
GLOW_RADIUS = 3 # 在缩小为 1/3 的图像上模糊。 | |
BACKGROUND = (4, 9, 19) | |
class Flock: | |
def __init__(self, count=BIRD_COUNT, seed=None): | |
rng = np.random.default_rng(seed) | |
self.position = rng.uniform([90, 90], [WIDTH - 90, HEIGHT - 90], (count, 2)) | |
angles = rng.uniform(0, 2 * np.pi, count) | |
self.velocity = np.column_stack((np.cos(angles), np.sin(angles))) * SPEED | |
def step(self, mode=4): | |
p, v = self.position, self.velocity | |
delta = p[None, :, :] - p[:, None, :] | |
distance_squared = np.sum(delta ** 2, axis=2) | |
neighbors = (distance_squared < VISION_RADIUS ** 2) | |
np.fill_diagonal(neighbors, False) | |
counts = neighbors.sum(axis=1, keepdims=True) | |
safe_counts = np.maximum(counts, 1) | |
acceleration = np.zeros_like(v) | |
if mode >= 2: | |
alignment = neighbors @ v / safe_counts - v | |
acceleration += alignment * (counts > 0) * ALIGNMENT | |
if mode >= 3: | |
toward_center = (delta * neighbors[:, :, None]).sum(axis=1) / safe_counts | |
acceleration += toward_center * COHESION | |
if mode >= 4: | |
close = (distance_squared < SEPARATION_RADIUS ** 2) & neighbors | |
repulsion = (delta * (close / np.maximum(distance_squared, 1))[:, :, None]).sum(axis=1) | |
acceleration -= repulsion * SEPARATION | |
# 靠近窗口边缘时平滑转向。 | |
for axis, boundary in enumerate((WIDTH, HEIGHT)): | |
acceleration[:, axis] += np.maximum(0, 95 - p[:, axis]) * 0.003 | |
acceleration[:, axis] -= np.maximum(0, p[:, axis] - (boundary - 95)) * 0.003 | |
updated = v + acceleration | |
length = np.linalg.norm(updated, axis=1, keepdims=True) | |
updated = np.where(length > 1e-8, updated / np.maximum(length, 1e-8) * SPEED, v) | |
self.velocity = updated | |
self.position = p + updated | |
# 极端情况下反射越界速度,避免个体被卡在边缘。 | |
for axis, boundary in enumerate((WIDTH, HEIGHT)): | |
hit = (self.position[:, axis] < 8) | (self.position[:, axis] > boundary - 8) | |
self.velocity[hit, axis] *= -1 | |
self.position[:, axis] = np.clip(self.position[:, axis], 8, boundary - 8) | |
class Renderer: | |
def __init__(self): | |
self.background = Image.new('RGB', (WIDTH, HEIGHT), BACKGROUND) | |
self.fade = Image.new('RGB', (WIDTH, HEIGHT), (TRAIL_RETENTION,) * 3) | |
self.clear() | |
def clear(self): | |
self.trail = Image.new('RGB', (WIDTH, HEIGHT)) | |
def draw(self, flock, t): | |
self.trail = ImageChops.multiply(self.trail, self.fade) | |
trail_draw = ImageDraw.Draw(self.trail) | |
heads = Image.new('RGB', (WIDTH, HEIGHT)) | |
head_draw = ImageDraw.Draw(heads) | |
for i, (position, velocity) in enumerate(zip(flock.position, flock.velocity)): | |
# RGB:青蓝与淡紫缓慢流动。修改这里即可改变配色。 | |
blend = (math.sin(i * 0.17 + t * 0.07) + 1) / 2 | |
color = (int(79 + 70 * blend), int(177 + 58 * (1 - blend)), 248) | |
x, y = position | |
dx, dy = velocity / SPEED | |
trail_draw.line((x - dx * 4, y - dy * 4, x, y), | |
fill=tuple(int(c * 0.6) for c in color), width=2) | |
head_draw.polygon([ | |
(x + dx * 5, y + dy * 5), | |
(x - dx * 3 - dy * 2, y - dy * 3 + dx * 2), | |
(x - dx * 2, y - dy * 2), | |
(x - dx * 3 + dy * 2, y - dy * 3 - dx * 2), | |
], fill=color) | |
# 缩小后模糊再放大,得到柔和光晕。 | |
glow = ImageChops.add(self.trail, heads).resize((WIDTH // 3, HEIGHT // 3)) | |
glow = glow.filter(ImageFilter.GaussianBlur(GLOW_RADIUS)) | |
glow = glow.resize((WIDTH, HEIGHT), Image.Resampling.BILINEAR) | |
image = ImageChops.add(self.background, glow) | |
image = ImageChops.add(image, self.trail) | |
return ImageChops.add(image, heads) | |
def main(): | |
root = tk.Tk() | |
root.title('发光鸟群 | Space 暂停 · R 重置 · 1–4 切换规则 · Esc 退出') | |
root.resizable(False, False) | |
canvas = tk.Canvas(root, width=WIDTH, height=HEIGHT, highlightthickness=0) | |
canvas.pack() | |
canvas_image = canvas.create_image(0, 0, anchor='nw') | |
state = {'flock': Flock(), 'mode': 4, 'paused': False, 'time': 0.0} | |
renderer = Renderer() | |
status = tk.StringVar() | |
tk.Label(root, textvariable=status, bg='#040913', fg='#a9dce7', pady=8).pack(fill='x') | |
def update_status(): | |
names = {1: '随机飞行', 2: '方向对齐', 3: '对齐 + 聚集', 4: '对齐 + 聚集 + 分离'} | |
status.set(f"{BIRD_COUNT} 只鸟 | {names[state['mode']]} | " | |
f"{'已暂停' if state['paused'] else '运行中'} | Space 暂停 / R 重置 / 1–4 规则 / Esc 退出") | |
def key(event): | |
k = event.keysym.lower() | |
if k == 'escape': | |
root.destroy() | |
return | |
if k == 'space': | |
state['paused'] = not state['paused'] | |
elif k == 'r': | |
state['flock'] = Flock() | |
renderer.clear() | |
state['time'] = 0.0 | |
elif k in ('1', '2', '3', '4'): | |
state['mode'] = int(k) | |
update_status() | |
def tick(): | |
start = time.perf_counter() | |
if not state['paused']: | |
state['flock'].step(state['mode']) | |
state['time'] += 1 / 30 | |
image = renderer.draw(state['flock'], state['time']) | |
photo = ImageTk.PhotoImage(image) | |
canvas.itemconfigure(canvas_image, image=photo) | |
canvas.photo = photo # 保持引用,防止图片被回收。 | |
elapsed_ms = (time.perf_counter() - start) * 1000 | |
root.after(max(1, int(1000 / 30 - elapsed_ms)), tick) | |
root.bind('<KeyPress>', key) | |
update_status() | |
tick() | |
root.mainloop() | |
if __name__ == '__main__': | |
main() |